
Hi guys, this is my guide for HQ 11-16s who use tanks. I don't know if high level players who use Scanks or All-Scorchers can draw anything from this as it is not intended for them. If you are a Scank user, go to the official forums and check out Garat's guide.
The Basics
Tanks aren't similar to any other troop you have. A single tank has a lot of health, second only to scorchers, and a lot of damage, although scorchers do more. However they take a lot of slots in your Landing Craft so you wont have very many. This means that tanks do about half as much damage as a squad of riflemen, and a fourth as much as a group of zookas. Keep in mind that this will likely be an even greater ratio, as it takes fewer upgrades to a landing craft to get another rifleman or zooka. Two Heavies have more health but far less damage. A tank's most valuble stat is its range. Tanks can outrange flamethrowers and ignore machine guns, and if a sniper tower, mortar, or anything with less range is on they other side of the HQ they can outrange it, boom cannons are also snipable if a space is there.
Reading Health Bars and Assessing Situations
Tanks are different from other troops except scorchers and maybe grenadiers in the fact that each and every single one is valuable, at your level. This means you must keep track of each one and make sure you understand what situation each tank is facing. First off, you must know how to read a tank's health bar and assess what it means:
In the Green
"In the Green" tanks sport full, bright green health bars. They have lots and lots of health and can be conidered safe if facing a low level sniper (with the support of other tanks) or a defence that poses little threat (like a flamethrower).
In the Orange
"In the Orange" tanks have orange health bars or green health bars that are near orange. These you should keep an eye on, make sure they stay behind other tanks. Snipers and Cannons will make very short work of these.
In the Red
"In the Red" tanks have red health bars and are in a desperate situation if being fired upon. Medkit them or shockbomb the defense firing at them. Tanks without any visible health bar can be considered lost if under fire, unless you have a fat wad of medkits or medics.
Situations
Farming
The tank in question is shooting at a economy buildng, support building, or flamethrower. It stands in no imminent danger and you should begin planning ahead.
Ill-Advised Farming
The tank in question is doing the same as above but is being fired at by a defence that can seiriously harm it. Reflare or shockbomb the defence.
Turret Clearing
The tank in question has enaged a turret. Help it along if the turret is dangerous with a shockbomb, shell or barrage. If a turret behind it dangerous, shockbomb that turret if the tank is in the red.
Sniping
The tank in question is firing at the HQ, Outpost, or Power Core and is not under fire. Leave it be unless tanks elsewhere need its help.
Ill-Advised HQ Attacking
Same as above, execpt a defense is firing at the tank in question. Reflare to a position where the defence in question can't attack your tanks if possible. If the above is not possible, shockbomb the defense or medkit the tank if it isn't very dangerous, flare your tanks to it if it has no support, or retreat if hopeless. Skip the last step or flare to an unsupported power cell/flamethrower to deal percentage damage if an operation.
On the Move
The tank in question is moving either to attack a building or traveling to a flared location. If the latter, make sure your flare was placed in such a way that dangerous turrets will not be shooting at it.
Defenses to Avoid
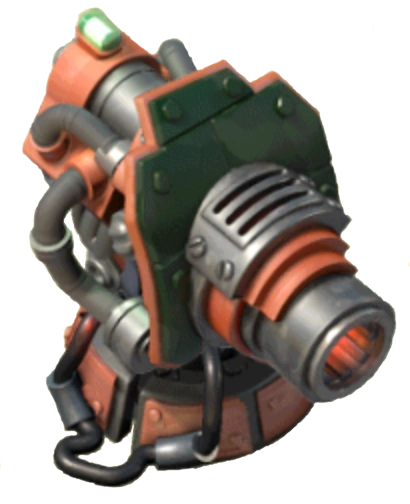
Doom Cannons
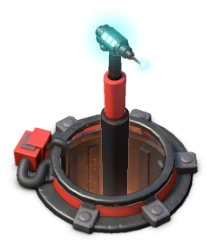

This is the mother of all anti-armour defenses. It has an insane range and can obliterate a tank in one shot, although it takes a while for its doom ray to recharge after expending so much energy. A base with doom cannons should be taken out with another strategy, its just too powerful and has too much health.
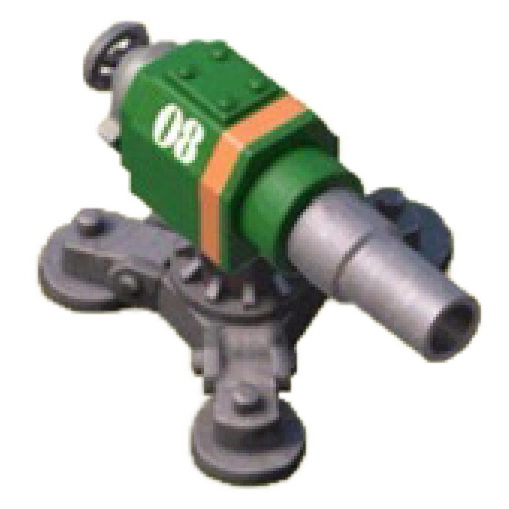
Boom Cannons

Boom Cannons can't fire as far as a prototype defence and can't quite one-shot a tank, but they reload faster. They should be your first priority. Only ignore these if you can safely flank them or another defence is more dangerous at the moment. If a boom cannon is on the other side of the HQ and a tile, tanks can outrange it. On power cores no tile is needed.
Shock Blasters
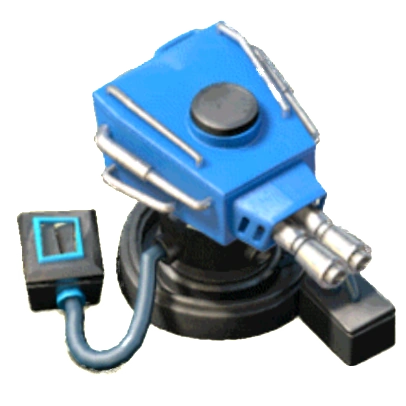

Also reasonably dangerous, Shock Blasters can shut down and destroy tanks from a distance, and given time for several bursts can rip an entire tank force to shreds.
Shock Launchers


These do far less damage than their prototype counterparts, but their heavy-duty shock bombs can immoblize entire groups of tanks. Especially deadly if paired with boom cannons and snipers.
Cannons

Although not as dangerous or ranged as boom cannons, regular cannons are still very dangerous. They fire more quickly, and a few shots will blast right through a tank's armour. Flank or blow up as many as you can.
Rocket Launchers


These may seem harmless at first glance, and a T-Med army can ignore them, but without medics rocket launchers can be devastating. Their very long range allows them to pummel tanks for very long periods of time, and I've seen many tanks battered into the red by a large rocket battery.
Sniper Towers

A common tank newbie mistake is to ignore Sniper Towers. This is a very dangerous practice and can lead to heavy casualties. Snipes fire quickly and do lots and lots of damage, especially since their long range allows them to take maximmum advantage of tank speed, which is nothing to brag about. The HQ can be sniped if the tanks are on the other side.
If your HQ is...
Level 11
Congratulations! You have unlocked tanks. Level 11 tank users can be very successful because there are no boom cannons to stop them, but they are hindered by a lack of landing craft space: HQ 11s can only deploy a maximum of 5 tanks.
Level 12
HQ 12s will be facing boom cannons often, but they can also land a maximum of 12 tanks.
HQ 13
HQ 13 won't gain any tanks, but will be facing rocket launchers.
HQ 14
HQ 14s now face double boom cannons, but also possess smokescreens, which can be useful.
HQ 15
HQ 15s gain medics which can be used in conjuction with tanks to land the formidible T-Med strategy. Weapons Labs also appear, which can mean that doom cannons may occasionaly appear.
HQ 16
HQ 16s gain grenadiers, a long range troop that also works well with tanks.
Combos
Note: A boat or two of Medics can be added to any of these if needed.
Rank
Basially Rooka, however the tanks do less damage but can survive far better if their meatsheids move elsewhere or are killed. 3-4 rifle boats, 2-3 tank boats depending on the base.
Hank
Heavies have more health than tanks when you consider that they are smaller. This can protect tanks from snipers and cannons, although damage output and sniping ability are reduced. 2-3 heavy boats, 3-4 tank boats.
T-Med
Like Hank, the damage output is reduced, but the medics can heal up the tanks, rendering them impervious to rockets and more fearsome verses snipers. You also have don't need to spend GBE on medkits as much. 4 tank boats, 2 medic boats.
Grank
Grenadiers can help take out defenses that would normally outrange tanks. 4 tank boat, 2 grenadier boats.